Pythonのクラスメンバ変数とメタクラス
とりあえず以下のようなプログラムについて考える.
class Reservoir(object):

    def get(self, key):
        value = key * 3  # Do something hard
        return value

if __name__ == "__main__":
    obj = Reservoir()
    print(obj.get('KEY1'))  # => KEY1KEY1KEY1
    print(obj.get('KEY2'))  # => KEY2KEY2KEY2
    print(obj.get('KEY1'))  # => KEY1KEY1KEY1
このget操作がコストを必要とする場合, キャッシュすることを考える. この場合, メンバ変数を使って以下のようにする.
import logging

class Reservoir(object):

    def __init__(self):
        self.DATA = {}

    def get(self, key):
        if key in self.DATA.keys():
            logging.info('The key [{}] is already processed.'.format(key))
            return self.DATA[key]
        logging.info('Processing the key [{}].'.format(key))
        value = key * 3  # Do something hard
        self.DATA[key] = value
        return value

if __name__ == "__main__":
    logging.basicConfig(level=logging.DEBUG)

    obj = Reservoir()
    print(obj.get('KEY1'))  # => INFO:root:Processing the key [KEY1].
                            # => KEY1KEY1KEY1
    print(obj.get('KEY2'))  # => INFO:root:Processing the key [KEY2].
                            # => KEY2KEY2KEY2
    print(obj.get('KEY1'))  # => INFO:root:The key [KEY1] is already processed.
                            # => KEY1KEY1KEY1
ただし, これだとあくまでもインスタンス化されたオブジェクトに記憶されるだけなので他の場所で呼びだしても参照されない.
obj1 = Reservoir()
print(obj1.get('KEY1'))  # => INFO:root:Processing the key [KEY1].
                         # => KEY1KEY1KEY1
obj2 = Reservoir()
print(obj2.get('KEY1'))  # => INFO:root:Processing the key [KEY1].
                         # => KEY1KEY1KEY1
オブジェクトのメンバ変数ではなく、クラスのメンバ変数にしてやればインスタンス間で共有できる.
class Reservoir(object):

    DATA = {}

    def get(self, key):
        # same as above ...

if __name__ == "__main__":
    logging.basicConfig(level=logging.DEBUG)

    print(Reservoir().get('KEY1'))  # => INFO:root:Processing the key [KEY1].
                                    # => KEY1KEY1KEY1
    print(Reservoir().get('KEY1'))  # => INFO:root:The key [KEY1] is already processed.
                                    # => KEY1KEY1KEY1
しかし次にこの手のクラスを継承して別のクラスを作ることを考える. 例えば以下のようにA, Bふたつの異なる処理をするクラスを考えると,
class Reservoir(object):

    DATA = {}

    def get(self, key):
        if key in self.DATA.keys():
            return self.DATA[key]
        value = self.process(key)
        self.DATA[key] = value
        return value

    def process(self, key):
        raise NotImplementedError()

class A(Reservoir):

    def process(self, key):
        return 'A processed the key, {}.'.format(key)

class B(Reservoir):

    def process(self, key):
        return 'B processed the key, {}.'.format(key)

if __name__ == "__main__":
    print(A().get('KEY1'))  # => A processed the key [KEY1].
    print(B().get('KEY1'))  # => A processed the key [KEY1].
同じクラスを継承しているため, 異なるクラス間で結果を共有してしまう. これはこれで正しい挙動だが, 今回の場合, AとBの結果は別々に記憶しておきたい.
そこでメタクラスを使う.
import logging

class ReservoirMeta(type):

    def __new__(cls, name, bases, attrs):
        attrs['DATA'] = {}

        def _get(self, key):
            if key in self.DATA.keys():
                logging.info("A cache for the key [{}] works.".format(key))
                return self.DATA[key]
            value = self.process(key)
            self.DATA[key] = value
            return value
        attrs['get'] = _get

        if 'process' not in attrs.keys():
            def _process(self, key):
                raise NotImplementedError()
            attrs['process'] = _process

        return super().__new__(cls, name, bases, attrs)

class A(metaclass=ReservoirMeta):

    def process(self, key):
        return 'A processed the key [{}].'.format(key)

class B(metaclass=ReservoirMeta):

    def process(self, key):
        return 'B processed the key [{}].'.format(key)

if __name__ == "__main__":
    logging.basicConfig(level=logging.DEBUG)

    print(A().get('KEY1'))  # => A processed the key [KEY1].
    print(B().get('KEY1'))  # => B processed the key [KEY1].
    print(A().get('KEY1'))  # => INFO:root:A cache for the key [KEY1] works.
                            # => A processed the key [KEY1].
    print(B().get('KEY1'))  # => INFO:root:A cache for the key [KEY1] works.
                            # => B processed the key [KEY1].
ReservoirMetaはReservoir相当の機能を備えたテンプレートとなってAやBを生成する. 言わば後付けでReservoirMetaの機能がクラスに付与される. というわけで継承とは異なる. 実際,
print(A.__bases__) # => (<class 'object'>,)
ただ後付けしているだけなのでデコレータでもいける. というか, 意味合い的に同じものだと考えて良いのかもしれない.
def reservoir(cls):
    setattr(cls, 'DATA', {})

    def _get(self, key):
        if key in self.DATA.keys():
            logging.info("A cache for the key [{}] works.".format(key))
            return self.DATA[key]
        value = self.process(key)
        self.DATA[key] = value
        return value
    setattr(cls, 'get', _get)

    if not hasattr(cls, 'process'):
        def _process(self, key):
            raise NotImplementedError()
        setattr(cls, 'process', _process)

    return cls

@reservoir
class A:
    # same as above ...
というわけでメタクラスの感覚をつかむために, ここまでさんざんやってきたがデコレータに戻ってきてしまった. というか, この事例ではメンバ関数にデコレータを直接かませば十分である.
import logging

def reservoir_deco(func):
    DATA = {}
    def wrapped(self, key):
        if key in DATA.keys():
            logging.info("A cache for the key [{}] works.".format(key))
            return DATA[key]
        value = func(self, key)
        DATA[key] = value
        return value
    return wrapped

class A(object):

    @reservoir_deco
    def get(self, key):
        return 'A processed the key [{}].'.format(key)

class B(object):

    @reservoir_deco
    def get(self, key):
        return 'B processed the key [{}].'.format(key)

if __name__ == "__main__":
    logging.basicConfig(level=logging.DEBUG)

    print(A().get('KEY1'))  # => A processed the key [KEY1].
    print(B().get('KEY1'))  # => B processed the key [KEY1].
    print(A().get('KEY1'))  # => INFO:root:A cache for the key [KEY1] works.
                            # => A processed the key [KEY1].
    print(B().get('KEY1'))  # => INFO:root:A cache for the key [KEY1] works.
                            # => B processed the key [KEY1].
webm動画をgifアニメーションにする
メモ.
$ ffmpeg -i input.webm frames/image-%04d.png
$ mogrify -crop 521x550+55+0 +repage frames/image-*.png
$ convert -delay 16 -layers optimize frames/image-*.png output.gif
ミソはmogrifyの+repageオプション. これがないと切り出した部分が透過gifになってしまう. cropの代わりに-trimを使っても良いがフレームによって切り出される範囲が変ってしまう可能性があるので注意.
変換のときは-layers optimizeオプションを使うと良い感じの画質にしてくれるようだ.
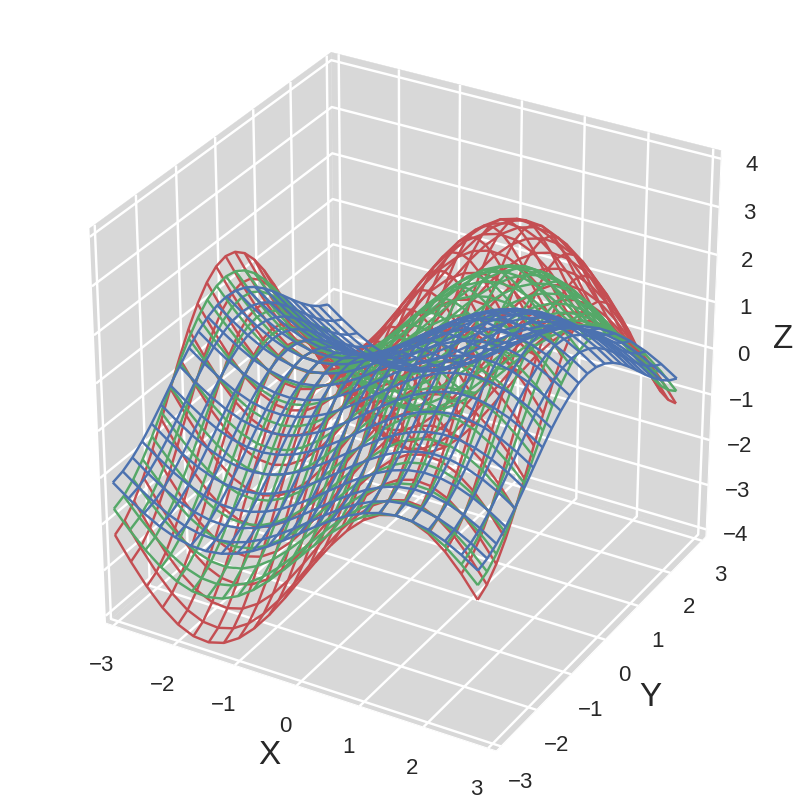
matplotlibの三次元プロットの見栄えを良くする その2
上の例でsurfaceでなくwireframeにしたければ, STARTからENDまでを
x = np.arange(-3, 3, 0.25)
y = np.arange(-3, 3, 0.25)
X, Y = np.meshgrid(x, y)
Z = np.sin(X)+ np.cos(Y)

for i in range(3):
    ax.plot_wireframe(X, Y, Z * (i * 0.5 + 1), color=color_palette[i % len(color_palette)])
などとすれば良い.
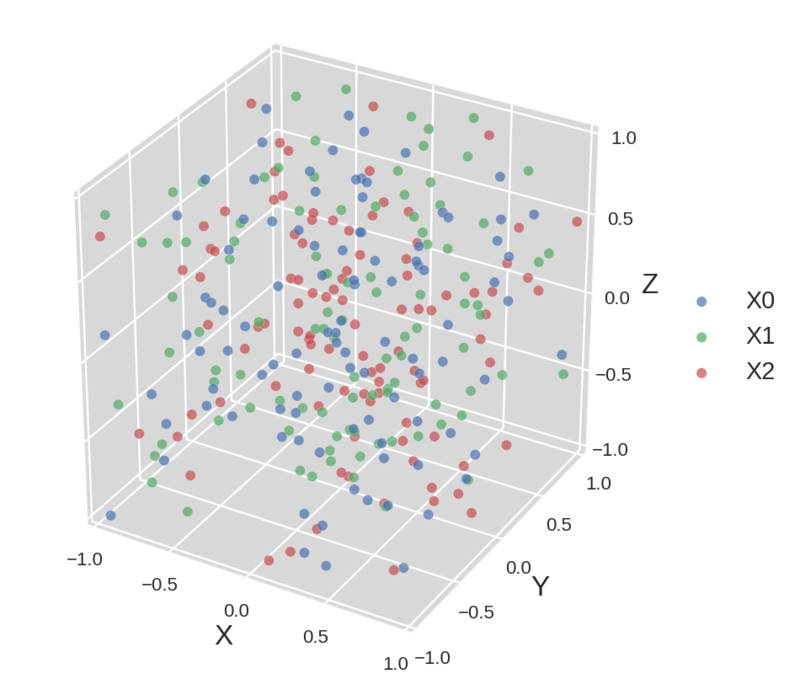
scatterプロットの場合, やはりlegendを表示させたいがこれは状況に応じて少し調整が必要である.
fig = plt.figure(figsize=(9.5, 8), dpi=80)

# ...
#XXX: START

for i in range(3):
    ax.scatter3D(
        np.random.uniform(-1, 1, 100), np.random.uniform(-1, 1, 100), np.random.uniform(-1, 1, 100),
        label='X{}'.format(i),
        c=color_palette[i % len(color_palette)], s=80, edgecolors='white', alpha=0.7)  #XXX: 'color' doesn't work. Use 'c'.
ax.set_xlim(-1, 1)
ax.set_ylim(-1, 1)
ax.set_zlim(-1, 1)

#XXX: END

ax.legend(loc='center left', bbox_to_anchor=(1.05, 0.5), fontsize='xx-large')

plt.subplots_adjust(left=0, right=0.83, top=1, bottom=0)
レジェンドの文字長(横幅)に応じて, figureのfigsizeの横幅(9.5), legendのbbox_to_anchorの横幅(1.2), subplot_adjustのright(0.83)を適宜調節して下さい.
scatterのlegendはmatplotlib 1.4などではまだうまく動かないのでダミーでlabelを用意するなどの回避策が必要になるようです.
matplotlibの三次元プロットの見栄えを良くする その1
seabornはmatplotlibの二次元プロットの見栄えを良くしてくれるが, 三次元となるとうまくいかない. これはseabornのせいというよりもむしろ, matplotlibでの二次元と三次元の扱いが全く別である上に, 三次元では相当にパラメータのハードコードが行われているせいようのようだ. matplotlib 1.5.1ではこの辺り良くなりつつあるのでseabornもそのうち対応するかもしれない.
とはいえ, 今見栄えを良くしたい. plotlyを使う手もあるがmatplotlibでそこそこがんばってみる.
from mpl_toolkits.mplot3d import Axes3D
from mpl_toolkits.mplot3d.axis3d import Axis
import matplotlib.pyplot as plt
import matplotlib as mpl
from matplotlib import cm
import itertools

import seaborn as sns
color_palette = sns.color_palette()
# color_palette = [
#     (0.2980392156862745, 0.4470588235294118, 0.6901960784313725),
#     (0.3333333333333333, 0.6588235294117647, 0.40784313725490196),
#     (0.7686274509803922, 0.3058823529411765, 0.3215686274509804),
#     (0.5058823529411764, 0.4470588235294118, 0.6980392156862745),
#     (0.8, 0.7254901960784313, 0.4549019607843137),
#     (0.39215686274509803, 0.7098039215686275, 0.803921568627451)]

fig = plt.figure(figsize=(8, 8), dpi=80)
ax = plt.subplot(111, projection='3d')

ax.set_axis_bgcolor('white')  # background color

for axis in (ax.xaxis, ax.yaxis, ax.zaxis):
    # axis._axinfo.update({
    #     # 'label' : {'va': 'center', 'ha': 'center'},
    #     # 'tick' : {'inward_factor': 0.2, 'outward_factor': 0.1},
    #     # 'axisline': {'linewidth': 0.5, 'color': (0, 0, 0, 1)},
    #     'grid' : {'color': (1, 1, 1, 1),'linewidth': 1.0},
    #     })

    # the grid color and width
    axis._axinfo['grid']['color'] = (1, 1, 1, 1)
    axis._axinfo['grid']['linewidth'] = 1.0

    for tick in axis.get_major_ticks():
        tick.label.set_fontsize(16)  # ticks label font size. 12 as a default

# set label texts. 'labelpad' means the distance between axis and label
ax.set_xlabel('X', fontsize=24, labelpad=14)
ax.set_ylabel('Y', fontsize=24, labelpad=14)
ax.set_zlabel('Z', fontsize=24, labelpad=14)

for axis in (ax.w_xaxis, ax.w_yaxis, ax.w_zaxis):
    axis.line.set_color("white")  # a color of each axis
    axis.set_pane_color((0.848, 0.848, 0.848, 1.0))  # a color of each pane
    # axis.set_pane_color((0.9176470588235294, 0.9176470588235294, 0.9490196078431372, 1.0))  # much more like the seaborn style

# make all ticks lines invisible
for line in itertools.chain(ax.get_xticklines(), ax.get_yticklines(), ax.get_zticklines()):
    line.set_visible(False)

#XXX: START

x = np.arange(-3, 3, 0.25)
y = np.arange(-3, 3, 0.25)
X, Y = np.meshgrid(x, y)
Z = np.sin(X)+ np.cos(Y)

# ax.plot_surface(X, Y, Z, rstride=1, cstride=1, cmap=cm.viridis, linewidth=0, antialiased=False)
ax.plot_surface(X, Y, Z, rstride=1, cstride=1, cmap=sns.cubehelix_palette(8, start=0.5, rot=-0.75, as_cmap=True), linewidth=0, antialiased=False)

#XXX: END

plt.subplots_adjust(left=0, right=1, top=1, bottom=0)
plt.show()
カラーマップにseabornのものを指定しているが, matplotlib 1.5.1では標準でviridisが使えるのでそちらが良いだろう.
Python3とmatplollib 1.5.1で試した. matplotlibの1.4系列などでは動かないかも.
LaTeXで二重引用符
日本語でLaTeXの文書を作成する際に, 半角の二重引用符をつかうと向きが揃ってしまってうまくいかない. シングルでも同じくだめ.
常識かもしれないが, バッククォートと使い分ける必要がある. つまり,
これが`単引用符'の場合で, こちらが``二重引用符''の場合.
ImportError: cannot import name SignedJwtAssertionCredentials
oauth2clientを使って以下のスクリプトを試していたが, タイトルにあるようなエラーで動かなかった.
上のスレッドでも良く指摘されているようにpyopensslがうまく入っていないのかといろいろ試したがよく読むと,
issue explained here: github.com/google/oauth2client/issues/401 – michael 12 hours ago
とあり, つい先日にどうやら仕様変更があったようだ. クソが.
Pythonにおけるwith構文の挙動を簡単に確認する
with構文の使い方というか実装の仕方を忘れがちなのでメモがてら簡単な確認コードを書いておく.
class Test(object):

    def __init__(self, *args, **kwargs):
        print('__init__', args, kwargs)

    def __enter__(self, *args, **kwargs):
        print('__enter__', args, kwargs)
        return self  #XXX: Donot forget this

    def __exit__(self, *args, **kwargs):
        print('__exit__', args, kwargs)

    def __del__(self, *args, **kwargs):
        print('__del__', args, kwargs)

    def say(self):
        print('hello')


if __name__ == '__main__':
    Test('spam').say()
    print('end1')

    with Test('spam') as obj:
        obj.say()
    print('end2')
これを実行すると、
('__init__', ('spam',), {})
hello
('__del__', (), {})
end1
('__init__', ('spam',), {})
('__enter__', (), {})
hello
('__exit__', (None, None, None), {})
end2
('__del__', (), {})
のようになるはず. 注意すべきは最後の__del__がend2の後にあることか. この実装だと二度目のTestはコードの最後までdelされない. __exit__でdel selfとしても無駄である. __enter__でreturnするオブジェクトがself以外であった場合(return Test()などとしてみれば良い), そのオブジェクトはwith構文のスコープを抜けるときにdelされるようだが, Testそのものはやはりdelされない.
ちなみに本業wのwith文中で例外が発生した場合を試すためには,
with Test('spam') as obj:
    obj.say()
    raise RuntimeError('oops!')
print('end1')
のようにしてみれば良くて, 結果はちゃんと以下のようになっている. end1は当然呼ばれない.
('__init__', ('spam',), {})
('__enter__', (), {})
hello
('__exit__', (<type 'exceptions.RuntimeError'>, RuntimeError('oops!',), <traceback object at 0x7fd14ccffc68>), {})
Traceback (most recent call last):
  File "with_statement.py", line 30, in <module>
    raise RuntimeError('oops!')
RuntimeError: oops!
('__del__', (), {})


